My Independent Studio Project
My Independent Studio Project (ISP) started off as a demo of the song Muddy Waters by Dorothea Wessel, the demo was comprised of vocals, acoustic guitar, trumpet, bass and drums.
by the end of this project, I had fleshed it out into a full track, with new drums and bass, also electric guitar, synth and piano.
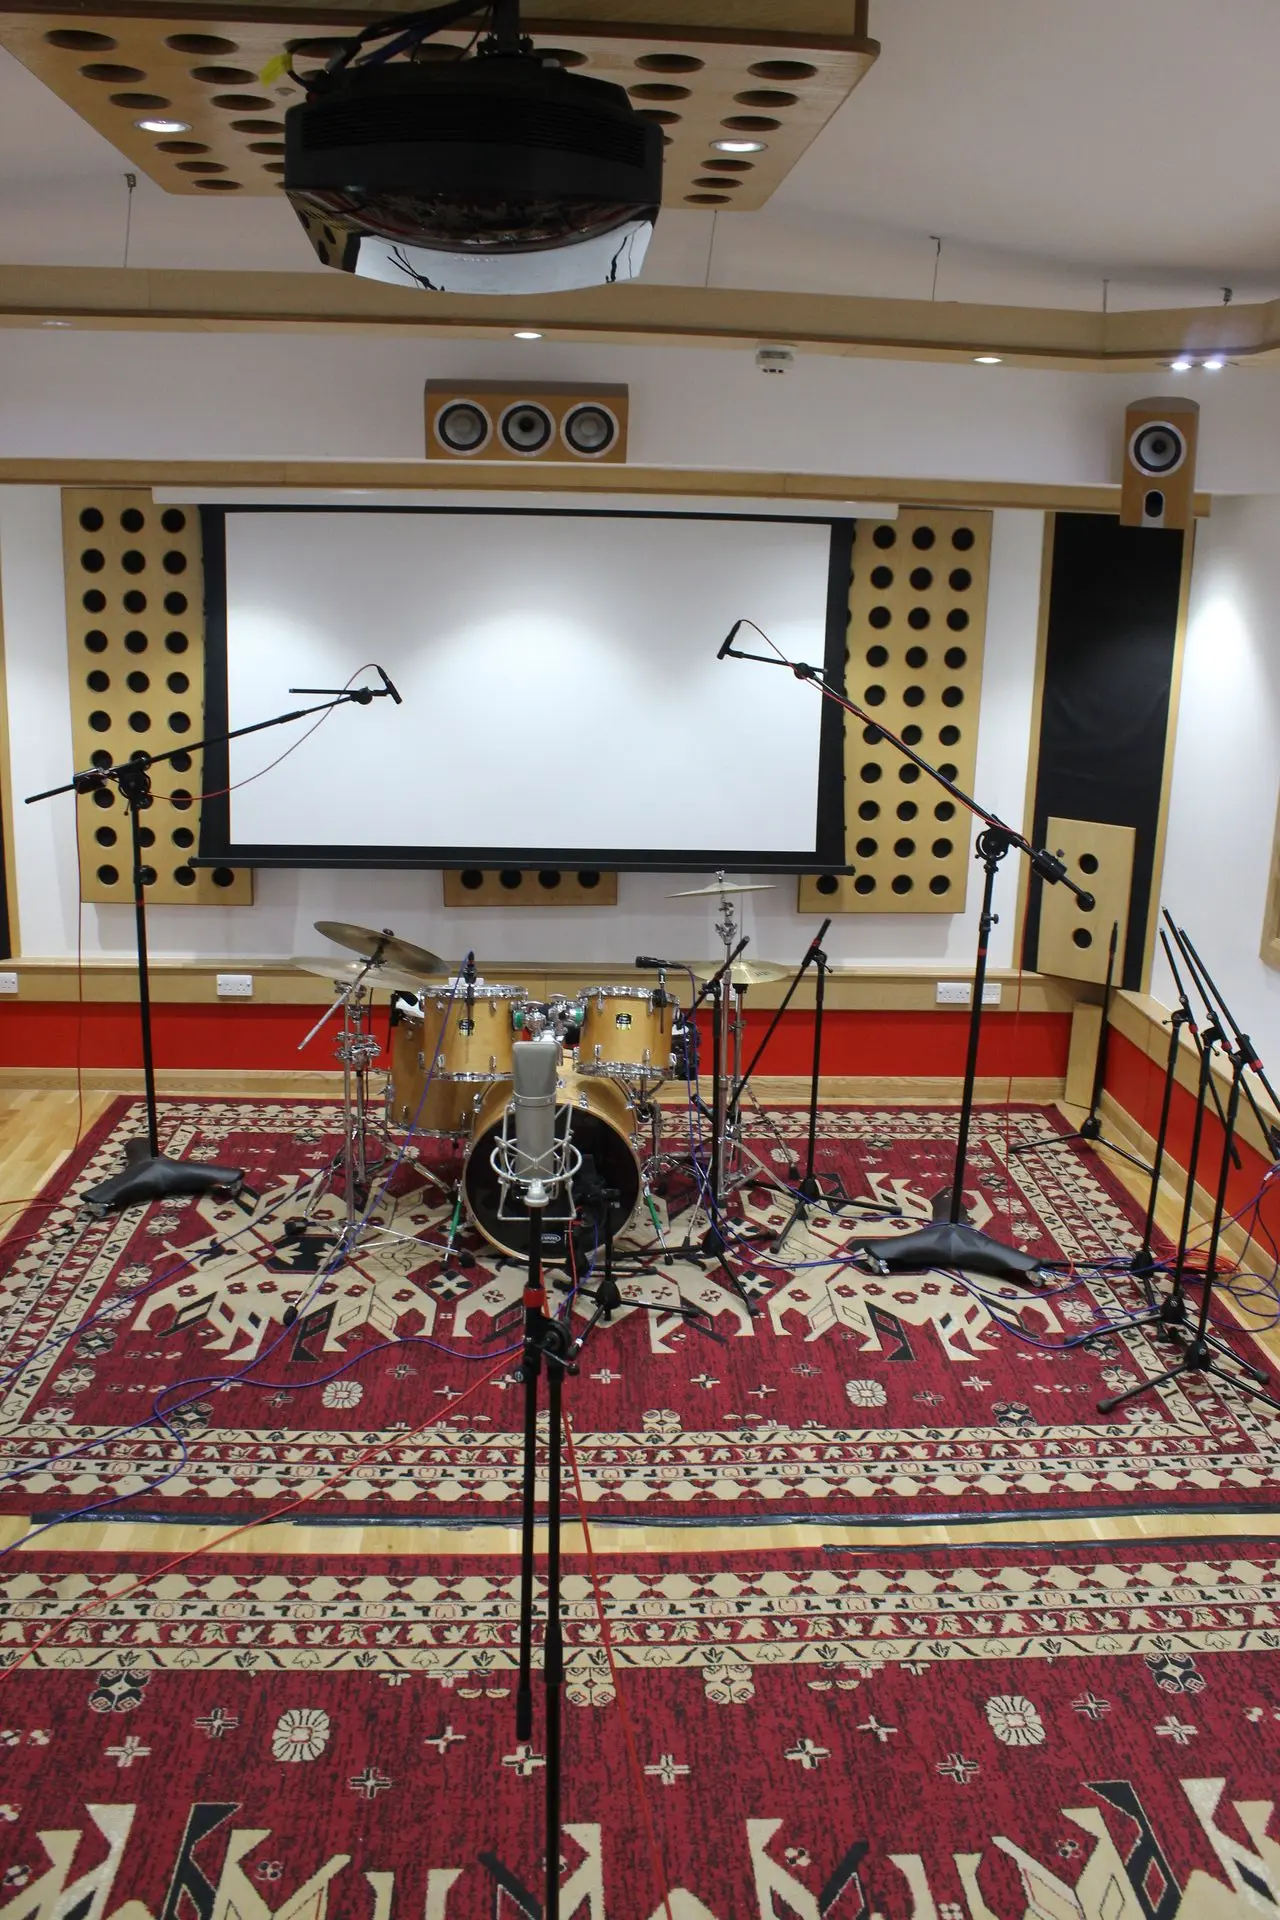
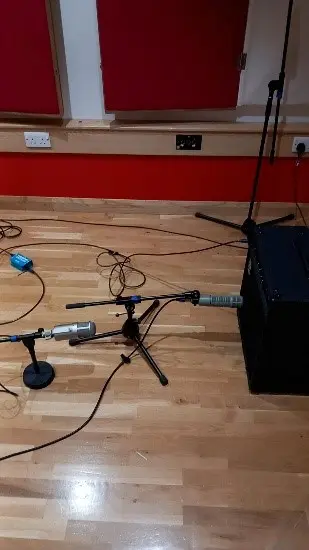


Recording Stage
Pre-Planning production - this was my plan for what I wanted to do
OVERVIEW
In terms of my approach to recording, I intend to record everything in a traditional multitrack recording style, as this is a pop song, and I would like everything to be tightly recorded and in time using a click track, this can be easily done if I record instruments in separate sessions.
When I record electric guitar, I will record guitar through DI and re amp it. I plan to use the Fender Hot Rod Deville Amp, as it can produce a very good clean tone. I will be using two microphones, one will be an sm57, placed close to the amplifier, it will also be off axis to capture more lower frequency content. The second microphone will be placed far away from the amp to capture the sound of the room, this can be blended into my final mix to provide a larger guitar sound.
The bass will be recorded using both DI and a miked amp. The mic I plan to use is the EV re20 as it is good for capturing bass frequencies. I plan to place the microphone close and off axis to get a darker tone with more bass frequencies. The amp I shall use is the Ampeg BA 112.
The acoustic guitar will be recorded using two ADX51s, the technique I will use is the X-Y technique, this is when microphones are places on top of one another, they will be placed 90 degrees to each other. The mics will be around 35 cm away from the guitar, one mic facing towards the 12th fret and the other facing towards the body and the sound hole. This will allow me to capture both the resonance of the guitar and the sound of the strings.
When I record keyboard, it will be through a stereo DI box, this will give a wide keyboard sound.
STYLISTIC APPROACH* & STRUCTURE
Chosen Genre – Alt Pop
The songs structure is quite simple: intro – verse – Chorus – Verse – Chorus – Bridge – Outro
ADDITIONAL INSTRUMENTATION/SOUND
Additional instrumentation to add – Electric Guitar, Strings, Keyboard, synths
SOURCES/SAMPLES (initial ideas)
Original Samples – Vocals & Brass
PLAYERS/PERFORMERS IDENTIFIED
Guitar - Declan
Bass – Finn
Drums - Jakub
Bookings:
I booked all of the studios for our recordings, we did also have studio time in SSL1+Live Room from 9 til 4 on the 26th of November, however we did not do the booking on this system, my bass reamp session is also not here, I will go into detail on why later on.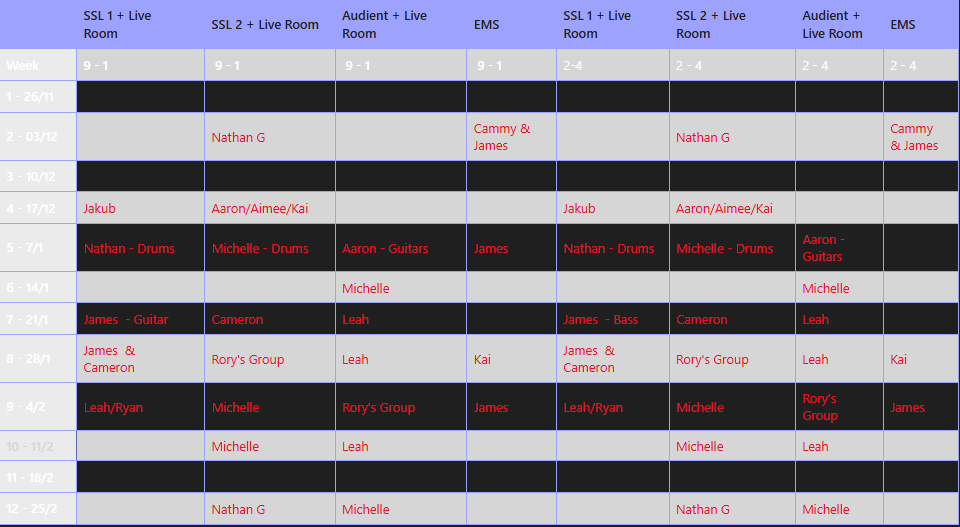
Production Journal
TRACKING SESSION APPROACH
This section is where you will document the practical process of your project. It should detail what was done and how, include personal thoughts and opinions with regards to decision making, and feature any researched techniques or approaches that you implemented.
Also worth bearing in mind that the use of pictorial, video, audio, and screenshot material should be utilised to augment and compliment your content here.
26 Nov 2024 - Drum Recording
I recorded drums with Kai and Aimee, we recorded the drums using the recorderman overheads technique, this is when one overhead captures the kit from above, and is placed behind the drummer, the mics were a stereo pair of Lewitt LCT 040.
We recorded with two kick drum mics, for kick in, we used an ADX D6, pointed at the beater, and on the outside we had an AKG C414, for snare top we used an ADX I5, and for snare bottom we used an sm57, on the tom drums we had an adx D4 on the floor tom drum, and adx d2, for a room mic we used a Neumann U87.
After recording we realised that the room mic wasn't working, unfortunately we were out of time so we couldn't re-record.
Our main goal in the session was to simply re record the drums that were in the muddy waters demo, as I liked what the drums played in the demo and didn't think any changes were needed, re recording them was only done to get a better sounding drum take.

17 december 2024 - Bass Recording
I recorded bass with Kai and Aimee.
We began with using flex time in pro tools to fix our drum recording, as it was slightly out of time. we used an Ampeg Cab with the orange terror head, the bass used was a fender squire jazz bass, the bass was recorded through DI and Re-amped, the mic used to capture the ev re20 on axis. The amp was gained up quite high.
7 january 2025 - Guitar Recording
I recorded Guitar with Kai, our Guitar player was Finn, the amp we used was the Roland Jazz Chorus, I used this amp as it gives a good clean tone, and the chorus effect gives the tone a thicker sound, it also matches the lyrics and title of the song, the chorus effect gives a "shimmery" effect and in my opinion gives the effect of the guitar being played underwater, chorus in the past has been described as "watery".
The guitar used was a Fender Telecaster Custom.
the mics we captured the sound with were an SM57 and an AKG C414, I chose these mics as they both bring out mid frequencies of what they capture, they were both slightly off axis. The amps gain wasn’t too high, the chorus effect on the amp was applied. Our aim in this session was to record something that could serve as a lead instrument.
Although I booked out the studio from 9-4, we ended up only having 3 hours to record, as someone else needed studio time, and we agreed to give them the studio time we had booked from 1- 4, we managed it all set up and recorded within three hours.


Client Feedback Session:
I had a client feedback session where I presented the track so far for critical analysis, the main point of critique was the tone of the bass, which was a bit too distorted for the alt pop style I was trying to go for.
There was also a point made to remove some of the guitar, although there were some great guitar parts in the recording, there were parts that sounded like the guitarist was just practicing or "noodling", I would end up fixing this in the mixing stage.
3 February 2025 - Bass Reamp
In this session I reamped bass in SSL2, I used the DI recording from my first bass recording session in session 2, the amp used was the Ampeg amp, the microphones used were the EV re20, placed close to the amp on axis, and the u47 fet which was placed far away from the amp.
The U47 fet was placed wrong by me, and was facing the floor, however the recording is still salvageable.
I used the reamp box to send the signal from pro tools to the SSL desk, then through one of the inputs in the live room, by using a XLR gender changer to make into an output, which then went to the amp.
After recording I moved the recorded audio into phase within pro tools.


11 February 2025 - Second Client Feedback Session
I again played my track up until this point mostly unmixed to be critically analysed, the main points made were that the outro didn't have enough of an impact, that it was super static and boring, this is why I would end up adding a piano to this outro section.
4 March 2025 - Piano and Synth
For the piano, I used Ableton's Grand Piano Instrument.
For the synthesiser, I used Ableton's Wavetable synthesiser, its purpose is to play along with the trumpet heard in the choruses and outro, I set it to be a mix between a triangle wave and a sawtooth wave. I used wavetables matrix to assign the built in low pass filter to an envelope generator (ADSR), meaning that whenever a note was played, the filter would automate from around 1 kHz and slowly cut less frequency content.
I ran the synth through Ableton's chorus effect to get a similar shimmery effect as the guitar, I set the rate to be quite low as i didn't want the effect to be too prevalent, finally I ran the synth into Ableton's Amp plugin, I kept it on the stock settings as I was only using it to slightly distort the synth and alter its frequency content.

Mix Planning
Edit the drums
turn up all the drums
Applying chorus to the vocals in the intro
Create reverb aux track
Compress Bass
Turn down bass in chorus sections using clip gain
Go through bass & guitar with elastic audio
Automate pan on the backing vocals
Automate Guitar level
De-ess vox
Make 414 guitar brighter (boost high frequencies)
Editing/mixing
Bass editing and mixing:
This is a screenshot of an edit I had I had to make to the bass recordings, removing a part where the bassist had played a wrong note, I used fades to fade out the cut, making it unnoticeable in the mix.

I also raised the volume of certain bass notes as they were too quite in the mix, as discussed in one of the feedback sessions.
I began with using Ableton's warp feature to put the bass notes into place, I did this by generating warp markers for every note, I would then move any notes that were noticeably out of time to their correct spot, I was always making sure to create anchor points whenever I moved a note as I did not want to affect any other notes other than the ones that I was trying to put in time.
The images below show all of the warped notes, as well as a before and after of warping a note in time.

Before

After

For the bass, I decided to boost everything between 100 and 200 hertz, as this is where I had cut out frequencies on my kickdrum to allow the bass to come through in this particular frequency range, I also did a small cut around 400 hertz as there were some very resonant frequencies that may have came from the farther away microphone due to the way it was placed, but I decided to removed it on the bass bus just in case it wasn't specific to that channel.
I then did a cut of everything above 10k and some of the high mid frequency range too, as it the lowest point I could have a high cut that didn't negatively affect the sound of the bass within the mix, so I cut it to give more room for instrumentation that is more prominent in the high mid to high frequency ranges.

I applied a compressor to even out the dynamics of the bass, as at points it would be inaudible in the mix and other points extremely loud, I put the threshold quite low and set a ratio of about 7:1, a decently fast attack and slower release knocked off around 10 decibels at louder points, I turned up the gain slightly to bring it up in the mix after compression, I also went with a harder knee as this is best for bass, especially with something as dynamic as this was.

I applied a sidechain compressor to the kick, this allows the kick to punch through the mix while not being drowned out by the bass, the compressor only activate when the kick hits, I had the threshold decently high with the ratio the same as the previous compressor, with a fast attack and release, as I didn't want to compress at all when the kick drum isn't being hit.

Electric Guitar Editing and Mixing:
for guitar I spent a short amount of time removing parts where I thought the guitar was unnecessary.

For EQ, I began with the AKG c414 recording, as it was a lot darker in tone with a lot less high mids, this is probably due to the positioning of the mics as well as their frequency responses, as sm57s pick more of that frequency range than 414s do, also we had the 414 more on the side of the cone, meaning it would capture even less of that range, this was a simple oversight that I was able to fix with this EQ.
so I used a bell to boost between 3 and 4 kilohertz to match it with the sm57 recording, I also had a bell cutting just below 300 hertz to help it match the sm57.

This EQ on the guitar bus has both a low cut around 85 hz and a high cut at around 9 khz, this is to get rid of unnecessary frequency information that will make the mix muddy, I also did a cut around 3k, although I boosted this range earlier I was making room for instruments like the trumpet and synth. I also did a slight boost in the lower mids range, this is where I wanted my electric guitar to be most prominent in the mix.

the compressor on my guitar bus (similar to the bass) was made to equal out the dynamic range of the guitar but not as much as I did with the bass, the threshold was set at about -35db, a ratio of between 7:1 and 8:1, a decently fast attack and release, it took off around 1 decibel at the louder points, I used the gain setting to bring it up in the mix after compression.

Acoustic Guitar Mixing, Editing and Sound Design:
For the intro, I took a note from the acoustic guitar part, reversed it, applied a reverb, consolidated the track, and reversed it again, I also did the same on the vocals. I also automated the sends to my delay and instrument reverb on this track to slowly build up.

I applied this chorus onto the acoustic guitar track to match the underwater feel of the track and other instrumentation.

Drums Editing and Mixing:
the kick out mic captured a bit too much of the other parts of the kit, particularly the cymbals, so i used a shelf to dampen frequencies above 1.5 kHz.

On the kick bus I did a cut at around 200 hz, this is a trick I took from Adam Getgood, in a video I linked in the additional information section of this page, he describes this range for a kick drum as sounding "flabby" meaning it loses a lot of punch when there is too much information in this frequency range, I also did this as it helps to give space for the bass within the mix, I also used a bell to boost about 2.5 kHz to boost the volume of the beater hitting the kick, and a high cut getting rid of unnecessary information.

for my compression on the kick, i had the threshold not too high, -14 db, and the ratio at 5:1, I also had the attack at 12 ms and the release at around 100 ms

For my overheads I used a shelf to get rid of everything below 200 hz as I wanted to only really have the cymbals coming through on this channel.

for my floor tom, I cut everything below 80hz as there was too much low end when the floor tom got hit.

On the rack tom, I put a low cut which cut at 40hz, I also had a cut at 200 hz as anytime the rack tom was hit there was a large amount of frequency information in this range, i also did a small boost at around 2k to capture more of the transient of the tom being hit.

on the snare top, I had a low cut to get rid of a lot of the low end information that would make the mix muddier, I also had a high cut at around 10 kHz for the same purpose, i also had a bell boosting between 1 and 2 kHz to help the snare cut through the mix a bit better.

I had this low cut on the snare bus at 100hz to get rid of a lot of unnecessary low end.

Brass/Synth mixing:
I applied this EQ to the brass and synth bus, the low cut was to get rid of everything below 100Hz to get rid of muddiness, I also had a cut at around 700Hz, as this is the range my electric guitar is most prominent, and I wanted to make space for it, I also boosted between 2 and 3 kHz to make the synths and trumpet more prominent in this range. I also had a high cut to get rid of unneeded frequency content.

Instrument Bus:
the solid bus compressor was set up with a threshold of 2.8 db, makeup of 3.5 db, a slow attack and a ratio of 4:1, the release was set to the auto setting, I used this compressor to bring my instrumentation together, using the mix glue preset I tweaked the threshold, makeup gain and attack until it fit into my mix.
This compressor was knocking off about 3 decibels at the loudest parts of the track.

Side chain Compressor:
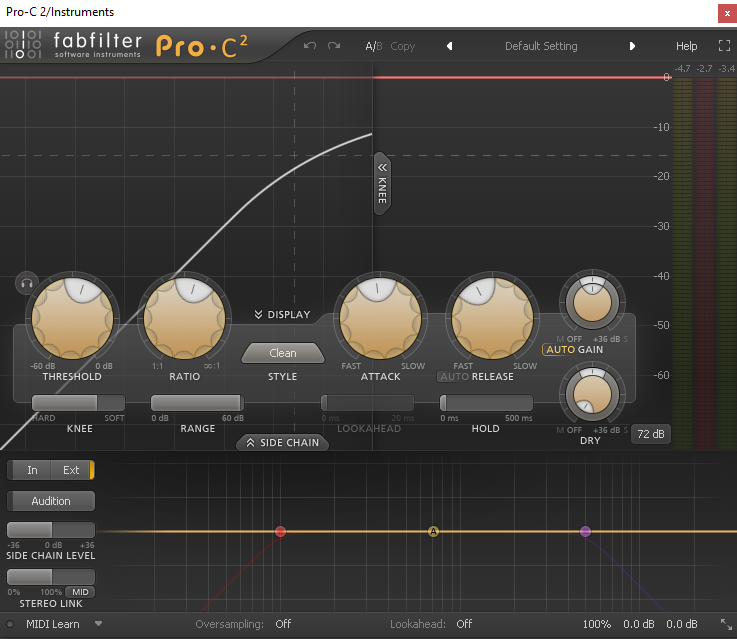
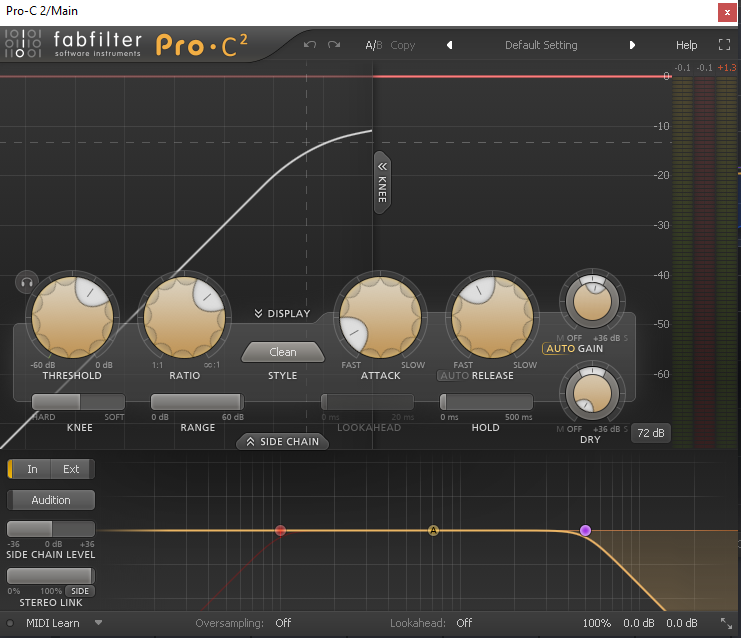
I had the Instrument bus side chained to the vocals using pro c2, the purpose of this was to compress all of the instrumentation while there is singing, allowing the vocals to come forward in the mix and never be drowned out by the instrumentation.
i had the threshold at -15.62 db, ratio set at -3.42, attack at 27 ms and release at 209 ms, I also applied a softer knee for this compressor, meaning that the compression is applied more gently. it was taking off around 4 decibels at the loudest points of the vocals.
Vocals Editing/Mixing:
I applied a De-Esser to get rid of the sibilance on all of the vocal tracks, targeting about 5 and 10 kHz to get rid of the sibilance heard when pronouncing "s".

Saturation/harmonic processing:
I applied Saturn on the vocal to increase the harmonic content of the recording, I created three bands, one for lower frequencies up to 519 hertz, one for 520 hertz and 1200 hertz and a final band for everything above 1200 Hz.
I used the warm tape for all bands as I liked that type of saturation on the vocals, with the drive on 20% for band 1, 31% for band 2, and 20% for band 3, this is because i wanted a bit more saturation on the lower mids of the vocals to bring out a bit more frequency content in this range.

Vox Verb Return track:
This is the reverb I made for my vox reverb return track, added a low cut and high cut as having too much low end in a reverb can lead to too much low end and muddiness in the mix, the high cut was a creative choice as I thought it sounded better with a high cut.
The instrument reverb return track was exactly the same, I just preferred it being on a different track.

Vocal Automation:
this automation was done to automate the backing vocals at different points in the songs, panning them from left to right and back, making the track a bit more dynamic.

Delay Return:
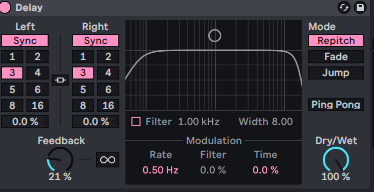
This was the delay effect i had on the delay return track, with delay time set to three beats and feedback set at 21%.
Mastering Automation:
I had some automation on the master, its purpose being to turn down the verses by around 3 decibels, this was to make the track a bit more dynamic without having to do it on each individual track and potentially affecting the processing I had done on everything.
Overall I had it coming in just about -5db, ready for mastering.
Find below the bounce of the final mix uploaded to soundcloud (NOT MASTER)
22 May 2025 - Mastering
EQ (Midside):
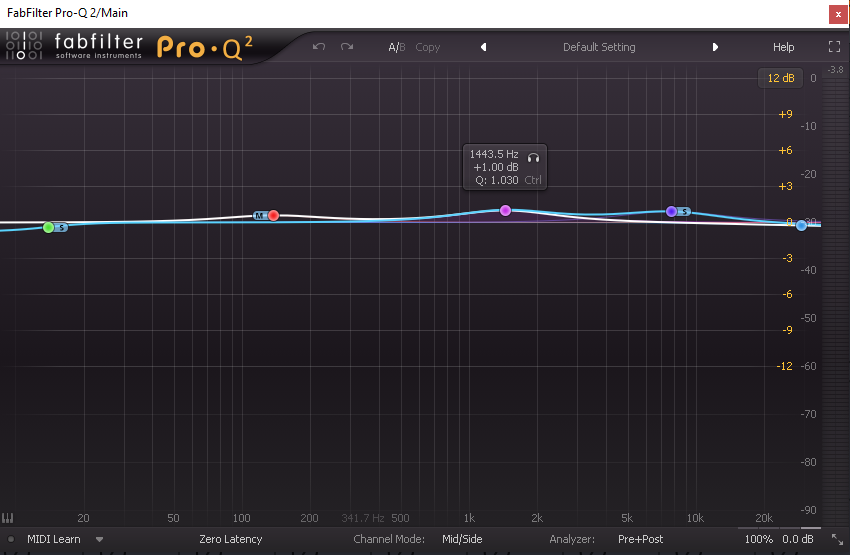
i applied a slight cut in the frequencies below 20hz on the sides, as I didnt want too much of these extremely low sub frequencies at the sides, I did a boost between 100 and 200 hertz in the middle, this was to bring up the volume of the bass in the middle.
i did a general boost across both the mid and side between 1 and 2 kHz, as I felt there wasn't enough of these mid frequencies in the mix, I applied a slight boost to frequencies between 5k and 15k at the sides, this was to boost the volume of the cymbals on the sides.
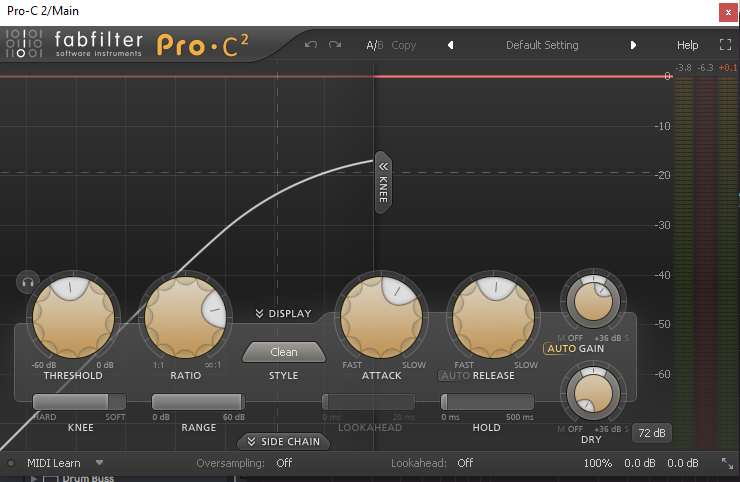
this compressor was used to smooth out the dynamic range of the track, a decently low threshold of -19db and ratio of 7:1, attack of 55 ms and release of 331 ms, with a soft knee.
Multiband Compression:
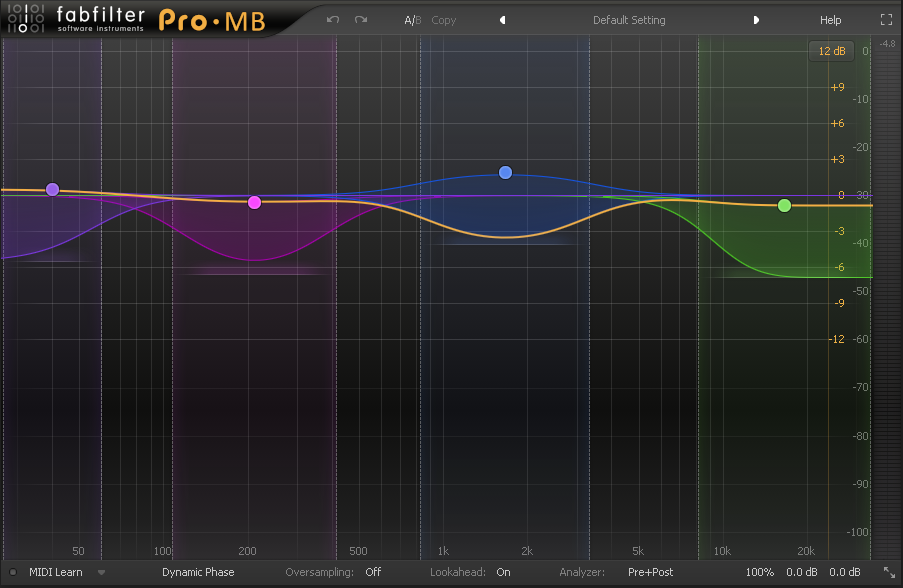
The first band compresses everything below 47 Hz, the second band compresses everything between 100 and 400 Hz, this is applying slight compression mostly on the bass and kick drum, the third band is expanding everything between 900 hz and around 5k, this is bringing up the volume of the mids and high mids, and the fourth band is compressing everything from 7.5 kHz up.
Side only Compressor:
this compressor was set by me to only apply compression to the sides, with a threshold of -13 db and a ratio of 5:1, a very fast attack of 0.25 ms and decently fast release of 209 ms, this was set to compress any frequencies below 4 kHz, as I only wanted to compress all of the instrumentation that wasn't the cymbals.
Saturn:
I applied saturn with two bands, one of everything below 340 Hz and one for everything above it, band 1 has the warm tube style of saturation enabled, i set the drive decently high around 70%, with the dynamics set to 0.615, with the bass and mid turned up by 0.35 db, treble down by 1.08 db and presence turned down by 1.79 db in the tone settings.
This really brings the low end of the mix together.
The second band used the warm tape saturation setting, with the mix set at around 25%, drive at 67.40%, with dynamics at 0.531, for the tone settings here were +2.20 db on the bass, +0.20 db on the mids, +0.79 db on the highs and 0 db for the presence. This applies some good saturation across everything that glues together everything.

Pro L:
I used pro L to raise the gain by 2db.

Limiter 2:
I used Ableton's limiter to limit my mix to -1.1db.

Phase check:
this plugin allowed me to check whether or not my master would be in phase when played in mono, my track was staying usually in the realm of +1, occasionally dipping towards -1, meaning it was good for mono playback.

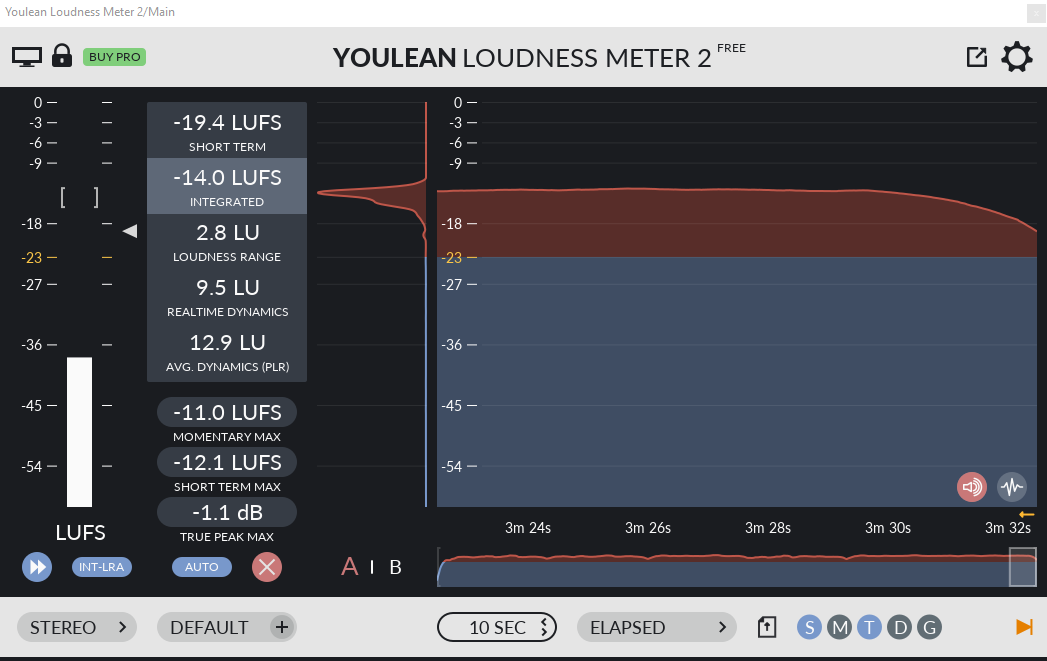
Youlean Loudness (LUFS):
For streaming platforms such as Spotify, there is a required LUFS level you are supposed to meet, I got my master to reach -14 LUFS, the optimal LUFS level for Spotify.
Additional Information
Any other content or material that you deem worthy of inclusion in your production journal. Could include reference list of researched articles/videos, contracts with session players or artists that feature in your project... etc.
ISP Inspiration Spotify – A playlist of songs that gave me inspiration as to how I want this song to sound by the time im done with it.
C414 on Kick - https://youtube.com/shorts/O1tRSA_FiMU?feature=shared
Adam “Nolly” Getgood Mixing Tips: https://youtu.be/6MphgmN-uGM?si=61eIms12nwW1eT01
Recording Agreements below:
Recording Agreement
Term:
The agreement between Jakub and Aaron shall commence 03/12/24 and continue until the Music Recordings are complete.
Agreement to Produce:
Number of Musical Recordings: 7
Minimum Number of Minutes Per Recording: 3 minutes 45 seconds
Completion of Recordings to be no later than: 28/02/24
Studio Details:
Artist will record in: Cumbernauld College SSL 2
Recording Schedule:
Jakub will be permitted to record during the following Dates and Times:
03/12/24 09:00 – 12:00
Assignment & Copyright
Both Jakub and Aaron will agree to: Aaron using previously mentioned recordings in “Muddy Waters” by Dorothea Wessel.
Jakub will have writing credits on this track.
Jakub Czajkowski
Date: 22/11/2024
Aaron Gibson
Date: 22/11/2024
Recording Agreement
Term:
The agreement between Finn and Aaron shall commence 17/12/24 and continue until the Music Recordings are complete.
Agreement to Produce:
Number of Musical Recordings: 2
Minimum Number of Minutes Per Recording: 3 minutes 45 seconds
Completion of Recordings to be no later than: 28/02/24
Studio Details:
Artist will record in: Cumbernauld College SSL 2
Recording Schedule:
Finn will be permitted to record during the following Dates and Times:
17/12/24 09:00 – 16:00
Assignment & Copyright
Both Finn and Aaron will agree to: Aaron using previously mentioned recordings in “Muddy Waters” by Dorothea Wessel.
Finn will have writing credits on this track.
Finnigan Togher
Date: 10/12/2024
Aaron Gibson
Date: 10/12/2024
Recording Agreement
Term:
The agreement between Declan and Aaron shall commence 07/01/25 and continue until the Music Recordings are complete.
Agreement to Produce:
Number of Musical Recordings: 2
Minimum Number of Minutes Per Recording: 3 minutes 45 seconds
Completion of Recordings to be no later than: 07/01/25
Studio Details:
Artist will record in: Cumbernauld College Audient
Recording Schedule:
Finn will be permitted to record during the following Dates and Times:
07/01/25 09:00 – 16:00
Assignment & Copyright
Both Declan and Aaron will agree to: Aaron using previously mentioned recordings in “Muddy Waters” by Dorothea Wessel.
Declan will have writing credits on this track.
Declan Allison
Date: 17/01/25
Aaron Gibson
Date: 17/01/25
To head to my next artefact, click the button below.